
Von Code Sentinel, Technical Project Manager & Security-Experte bei Java Fleet Systems Consulting
Schwierigkeit: 🟡 Mittel | 🔴 Fortgeschritten
Lesezeit: 22 Minuten
Voraussetzungen: Java 17+, Maven-Grundlagen, Teil 1 dieser Serie
📚 Was bisher geschah – Spring CLI vs. Spring Shell
Bereits veröffentlicht:
- ✅ Teil 1: Spring CLI vs. Spring Shell – Was ist was?
- Warum CLI-Tools im DevOps-Kontext wichtig sind
- Spring CLI = fertiges Tool zum Bootstrappen
- Spring Shell = Framework zum Bauen eigener CLIs
Heute: Teil 2 – Wir bauen ein vollständiges DevOps-Admin-Tool mit Spring Shell
Neu in der Serie?
- 🟢 Einsteiger? Lies erst Teil 1 für den Kontext
- 🟡 Erfahren? Du kannst hier einsteigen, Basics werden kurz erklärt
⚡ Das Wichtigste in 30 Sekunden
Dein Problem: Du willst wiederkehrende DevOps-Tasks automatisieren, aber Bash-Skripte werden unübersichtlich und sind schwer zu testen.
Die Lösung: Ein eigenes CLI-Tool mit Spring Shell – typsicher, testbar, mit Auto-Dokumentation.
Heute lernst du:
- ✅ Spring Shell Projekt von Grund auf aufsetzen
- ✅ Commands mit Parametern, Validierung und Hilfe-Texten
- ✅ Custom Prompts und Styling
- ✅ Commands testen (ja, wirklich!)
- ✅ Native Image für schnellen Startup (Bonus)
Für wen ist dieser Artikel?
- 🌱 Anfänger: Du baust dein erstes CLI-Tool
- 🌿 Erfahrene: Du lernst Best Practices und Testing
- 🌳 Profis: GraalVM Native Image und Advanced Patterns
Zeit-Investment: 22 Minuten (plus Coding-Zeit)
👋 Code Sentinel: „Heute wird gebaut, nicht nur geredet.“
Hey! 👋
Code Sentinel hier. In Teil 1 haben wir viel Theorie gemacht – heute wird’s praktisch.
Die Situation: Unser Team hat 15 Microservices. Jeder braucht regelmäßig:
- Health Checks
- Log-Abfragen
- Deployments
- Rollbacks
Bisher? Ein Sammelsurium aus Bash-Skripten, kubectl-Befehlen und „frag Bernd, der weiß wie’s geht“.
Die Lösung: Ein zentrales Admin-Tool. Eine Shell. Alle Commands dokumentiert. Testbar.
Das bauen wir jetzt. 🚀
🎯 Was wir bauen
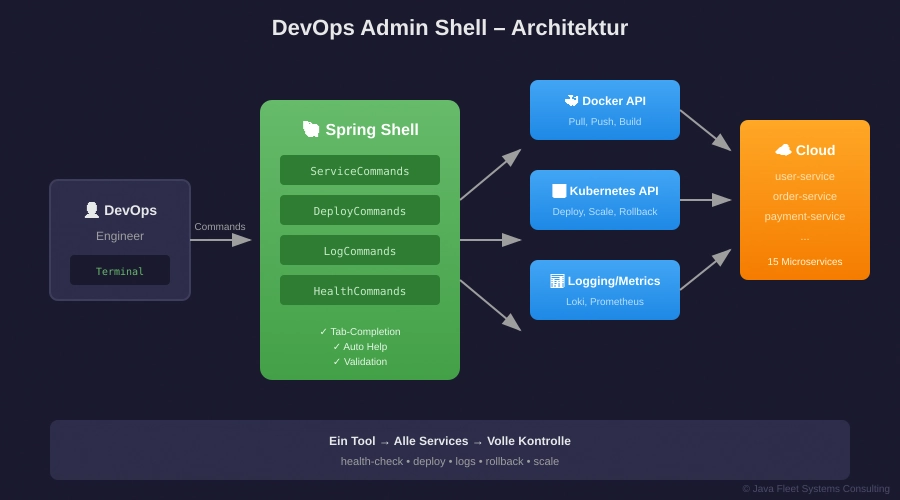
Abbildung 1: Unser DevOps Admin Tool – eine zentrale Shell für alle Operationen
Features unseres Tools:
| Command | Funktion |
|---|---|
status | System-Übersicht |
services | Alle Services auflisten |
health-check | Health aller Services prüfen |
deploy <service> --version | Service deployen |
logs <service> --lines | Logs abrufen |
rollback <service> | Zur vorherigen Version |
Am Ende hast du:
- Ein lauffähiges JAR (oder Native Binary)
- Tab-Completion für alle Commands
- Automatische Help-Texte
- Validierte Eingaben
- Getestete Commands
🟢 GRUNDLAGEN
Projekt-Setup
💡 Neu hier? Was ist Spring Boot?
Spring Boot ist Spring Framework mit „Starthilfe“ – Auto-Configuration, eingebetteter Server, schneller Start. Seit 2014 der Standard für neue Spring-Projekte.
Option 1: Spring Initializr (Web)
Geh auf start.spring.io:
- Project: Maven
- Language: Java
- Spring Boot: 3.3.6
- Dependencies: Keine (Spring Shell fügen wir manuell hinzu)
Option 2: Spring CLI (Kommandozeile)
spring init --dependencies=none --java-version=21 devops-admin
cd devops-admin
Option 3: Unser fertiges Starter-Projekt
# Download aus Teil 1
unzip spring-cli-shell-teil1.zip
cd teil1/maven-projekt
Die pom.xml
<?xml version="1.0" encoding="UTF-8"?>
<project xmlns="http://maven.apache.org/POM/4.0.0"
         xmlns:xsi="http://www.w3.org/2001/XMLSchema-instance"
         xsi:schemaLocation="http://maven.apache.org/POM/4.0.0
                             https://maven.apache.org/xsd/maven-4.0.0.xsd">
    <modelVersion>4.0.0</modelVersion>

    <parent>
        <groupId>org.springframework.boot</groupId>
        <artifactId>spring-boot-starter-parent</artifactId>
        <version>3.3.6</version>
    </parent>

    <groupId>online.java-developer</groupId>
    <artifactId>devops-admin-shell</artifactId>
    <version>1.0.0</version>
    <name>DevOps Admin Shell</name>

    <properties>
        <java.version>21</java.version>
        <spring-shell.version>3.3.3</spring-shell.version>
    </properties>

    <dependencies>
        <!-- Spring Shell - Das Herzstück -->
        <dependency>
            <groupId>org.springframework.shell</groupId>
            <artifactId>spring-shell-starter</artifactId>
            <version>${spring-shell.version}</version>
        </dependency>

        <!-- Für HTTP-Calls zu Services -->
        <dependency>
            <groupId>org.springframework.boot</groupId>
            <artifactId>spring-boot-starter-webflux</artifactId>
        </dependency>

        <!-- Validation -->
        <dependency>
            <groupId>org.springframework.boot</groupId>
            <artifactId>spring-boot-starter-validation</artifactId>
        </dependency>

        <!-- Testing -->
        <dependency>
            <groupId>org.springframework.boot</groupId>
            <artifactId>spring-boot-starter-test</artifactId>
            <scope>test</scope>
        </dependency>
        <dependency>
            <groupId>org.springframework.shell</groupId>
            <artifactId>spring-shell-starter-test</artifactId>
            <version>${spring-shell.version}</version>
            <scope>test</scope>
        </dependency>
    </dependencies>

    <build>
        <plugins>
            <plugin>
                <groupId>org.springframework.boot</groupId>
                <artifactId>spring-boot-maven-plugin</artifactId>
            </plugin>
        </plugins>
    </build>
</project>
Die Main-Klasse
package online.javadeveloper.devopsadmin;

import org.springframework.boot.SpringApplication;
import org.springframework.boot.autoconfigure.SpringBootApplication;

@SpringBootApplication
public class DevOpsAdminApplication {

    public static void main(String[] args) {
        SpringApplication.run(DevOpsAdminApplication.class, args);
    }
}
Das war’s für den Start. Spring Shell braucht keine weitere Konfiguration – Auto-Configuration macht den Rest.
Erster Command
package online.javadeveloper.devopsadmin.commands;

import org.springframework.shell.standard.ShellComponent;
import org.springframework.shell.standard.ShellMethod;

@ShellComponent
public class HelloCommands {

    @ShellMethod(value = "Sagt Hallo", key = "hello")
    public String hello() {
        return "👋 Hallo aus der DevOps Admin Shell!";
    }
}
Starten:
./mvnw spring-boot:run
Output:
  .   ____          _            __ _ _
 /\\ / ___'_ __ _ _(_)_ __  __ _ \ \ \ \
( ( )\___ | '_ | '_| | '_ \/ _` | \ \ \ \
 \\/  ___)| |_)| | | | | || (_| |  ) ) ) )
  '  |____| .__|_| |_|_| |_\__, | / / / /
 =========|_|==============|___/=/_/_/_/

shell:> hello
👋 Hallo aus der DevOps Admin Shell!

shell:> help
AVAILABLE COMMANDS

Built-In Commands
       help: Display help about available commands
       clear: Clear the shell screen
       exit, quit: Exit the shell

Hello Commands
       hello: Sagt Hallo
Geschafft! Dein erster Spring Shell Command läuft. 🎉
💡 Du kennst die Basics schon?
🟡 PROFESSIONALS
Command-Anatomie verstehen

Abbildung 2: Die Anatomie eines Spring Shell Commands
Die wichtigsten Annotationen:
| Annotation | Zweck | Beispiel |
|---|---|---|
@ShellComponent | Markiert Klasse als Command-Provider | Auf Klassen-Ebene |
@ShellMethod | Definiert einen Command | value = Beschreibung, key = Name |
@ShellOption | Konfiguriert Parameter | Defaults, Hilfe, Required |
Vollständige Command-Klasse: ServiceCommands
package online.javadeveloper.devopsadmin.commands;

import org.springframework.shell.standard.ShellComponent;
import org.springframework.shell.standard.ShellMethod;
import org.springframework.shell.standard.ShellOption;
import org.springframework.beans.factory.annotation.Autowired;

@ShellComponent
public class ServiceCommands {

    private final ServiceRegistry registry;
    private final HealthChecker healthChecker;

    @Autowired
    public ServiceCommands(ServiceRegistry registry, HealthChecker healthChecker) {
        this.registry = registry;
        this.healthChecker = healthChecker;
    }

    @ShellMethod(value = "Listet alle registrierten Services", key = "services")
    public String listServices() {
        var services = registry.getAllServices();

        if (services.isEmpty()) {
            return "⚠️ Keine Services registriert.";
        }

        var sb = new StringBuilder();
        sb.append("📋 Registrierte Services:\n\n");

        for (var service : services) {
            sb.append("  • ").append(service.name())
              .append(" (").append(service.url()).append(")\n");
        }

        return sb.toString();
    }

    @ShellMethod(value = "Prüft Health eines oder aller Services", key = "health-check")
    public String healthCheck(
            @ShellOption(
                defaultValue = ShellOption.NULL,
                help = "Service-Name (leer = alle)"
            ) String service) {

        if (service == null) {
            return healthChecker.checkAll();
        }

        return healthChecker.check(service);
    }

    @ShellMethod(value = "Zeigt Logs eines Services", key = "logs")
    public String logs(
            @ShellOption(help = "Name des Services")
            String service,

            @ShellOption(defaultValue = "50", help = "Anzahl Zeilen (1-500)")
            int lines,

            @ShellOption(defaultValue = "false", help = "Nur Errors anzeigen")
            boolean errorsOnly) {

        // Validierung
        if (lines < 1 || lines > 500) {
            return "❌ --lines muss zwischen 1 und 500 liegen.";
        }

        if (!registry.exists(service)) {
            return "❌ Service nicht gefunden: " + service;
        }

        return registry.getLogs(service, lines, errorsOnly);
    }
}
Dependency Injection in Commands
Spring Shell Commands sind normale Spring Beans. Du kannst alles injizieren:
@ShellComponent
public class DeployCommands {

    private final DockerClient docker;
    private final KubernetesClient k8s;
    private final NotificationService notifications;
    private final AuditLogger audit;

    // Constructor Injection (empfohlen)
    public DeployCommands(DockerClient docker,
                          KubernetesClient k8s,
                          NotificationService notifications,
                          AuditLogger audit) {
        this.docker = docker;
        this.k8s = k8s;
        this.notifications = notifications;
        this.audit = audit;
    }

    @ShellMethod(value = "Deployed einen Service", key = "deploy")
    public String deploy(
            @ShellOption(help = "Service-Name") String service,
            @ShellOption(defaultValue = "latest") String version,
            @ShellOption(defaultValue = "staging") String environment) {

        audit.log("DEPLOY_START", service, version, environment);

        try {
            // 1. Image pullen
            docker.pull(service + ":" + version);

            // 2. Deployment aktualisieren
            k8s.updateDeployment(environment, service, version);

            // 3. Warten auf Rollout
            k8s.waitForRollout(environment, service);

            // 4. Benachrichtigen
            notifications.send("✅ " + service + ":" + version +
                             " deployed to " + environment);

            audit.log("DEPLOY_SUCCESS", service, version, environment);

            return "✅ Deployment erfolgreich!";

        } catch (Exception e) {
            audit.log("DEPLOY_FAILED", service, version, environment, e);
            return "❌ Deployment fehlgeschlagen: " + e.getMessage();
        }
    }
}
Input-Validierung
Option 1: Manuelle Validierung
@ShellMethod("Skaliert einen Service")
public String scale(
        @ShellOption String service,
        @ShellOption int replicas) {

    if (replicas < 0 || replicas > 100) {
        return "❌ Replicas muss zwischen 0 und 100 liegen.";
    }

    if (!registry.exists(service)) {
        return "❌ Service nicht gefunden: " + service;
    }

    // ... Logik
}
Option 2: Bean Validation (JSR-380)
@ShellComponent
public class ValidatedCommands {

    @ShellMethod("Erstellt einen neuen Service")
    public String createService(
            @ShellOption
            @Pattern(regexp = "^[a-z][a-z0-9-]*$",
                    message = "Name muss lowercase, mit Buchstabe starten")
            String name,

            @ShellOption
            @Min(value = 1, message = "Mindestens 1 Replica")
            @Max(value = 10, message = "Maximal 10 Replicas")
            int replicas) {

        return "✅ Service " + name + " mit " + replicas + " Replicas erstellt.";
    }
}
Custom Prompt
Die Standard-Prompt shell:> ist langweilig. Machen wir sie besser:
package online.javadeveloper.devopsadmin.config;

import org.jline.utils.AttributedString;
import org.jline.utils.AttributedStyle;
import org.springframework.shell.jline.PromptProvider;
import org.springframework.stereotype.Component;

@Component
public class CustomPromptProvider implements PromptProvider {

    private String currentEnvironment = "staging";

    @Override
    public AttributedString getPrompt() {
        // Format: [env] devops-admin:>
        String prompt = "[" + currentEnvironment + "] devops-admin:> ";

        // Farbe basierend auf Environment
        AttributedStyle style = switch (currentEnvironment) {
            case "production" -> AttributedStyle.DEFAULT
                    .foreground(AttributedStyle.RED)
                    .bold();
            case "staging" -> AttributedStyle.DEFAULT
                    .foreground(AttributedStyle.YELLOW);
            default -> AttributedStyle.DEFAULT
                    .foreground(AttributedStyle.GREEN);
        };

        return new AttributedString(prompt, style);
    }

    public void setEnvironment(String env) {
        this.currentEnvironment = env;
    }
}
Command zum Wechseln:
@ShellComponent
public class EnvironmentCommands {

    private final CustomPromptProvider promptProvider;

    public EnvironmentCommands(CustomPromptProvider promptProvider) {
        this.promptProvider = promptProvider;
    }

    @ShellMethod(value = "Wechselt das aktive Environment", key = "use-env")
    public String useEnvironment(
            @ShellOption(help = "dev, staging oder production") String env) {

        if (!Set.of("dev", "staging", "production").contains(env)) {
            return "❌ Ungültiges Environment. Erlaubt: dev, staging, production";
        }

        promptProvider.setEnvironment(env);
        return "✅ Environment gewechselt zu: " + env;
    }
}
Ergebnis:
[staging] devops-admin:> use-env production
✅ Environment gewechselt zu: production

[production] devops-admin:>    ← Jetzt rot und fett!
Command Availability
Manche Commands sollen nur unter bestimmten Bedingungen verfügbar sein:
@ShellComponent
public class ProductionCommands {

    private final EnvironmentService envService;

    @ShellMethod(value = "Löscht alle Daten (nur Dev!)", key = "nuke-data")
    public String nukeData() {
        // Gefährliche Operation
        return "💥 Alle Daten gelöscht!";
    }

    // Diese Methode kontrolliert die Verfügbarkeit
    public Availability nukeDataAvailability() {
        if (envService.isProduction()) {
            return Availability.unavailable("Nicht in Production verfügbar!");
        }
        return Availability.available();
    }
}
In Production:
[production] devops-admin:> nuke-data
Command 'nuke-data' exists but is not currently available because
Nicht in Production verfügbar!
Code Sentinel’s Tipp:
„Availability-Checks sind dein Sicherheitsnetz. Gefährliche Commands gehören hinter solche Checks – immer.“
🔵 BONUS
Commands Testen
Ja, Spring Shell Commands sind testbar. Und das solltest du nutzen!
package online.javadeveloper.devopsadmin.commands;

import org.junit.jupiter.api.Test;
import org.springframework.beans.factory.annotation.Autowired;
import org.springframework.boot.test.context.SpringBootTest;
import org.springframework.shell.test.ShellAssertions;
import org.springframework.shell.test.ShellTestClient;
import org.springframework.shell.test.autoconfigure.ShellTest;

import static org.assertj.core.api.Assertions.assertThat;

@ShellTest
@SpringBootTest
class ServiceCommandsTest {

    @Autowired
    private ShellTestClient client;

    @Test
    void testListServices() {
        ShellTestClient.NonInteractiveShellSession session =
            client.nonInterative("services").run();

        assertThat(session.screen().lines())
            .anyMatch(line -> line.contains("Registrierte Services"));
    }

    @Test
    void testHealthCheckWithInvalidService() {
        ShellTestClient.NonInteractiveShellSession session =
            client.nonInterative("health-check", "--service", "non-existent").run();

        assertThat(session.screen().lines())
            .anyMatch(line -> line.contains("nicht gefunden"));
    }

    @Test
    void testDeployRequiresServiceName() {
        ShellTestClient.NonInteractiveShellSession session =
            client.nonInterative("deploy").run();

        // Sollte Fehler zeigen weil --service fehlt
        assertThat(session.screen().lines())
            .anyMatch(line -> line.contains("Missing") || line.contains("required"));
    }
}
Unit-Tests für Command-Logik:
@ExtendWith(MockitoExtension.class)
class DeployCommandsUnitTest {

    @Mock
    private DockerClient docker;

    @Mock
    private KubernetesClient k8s;

    @InjectMocks
    private DeployCommands commands;

    @Test
    void deploy_shouldPullImageAndUpdateDeployment() {
        // Given
        when(k8s.updateDeployment(any(), any(), any())).thenReturn(true);

        // When
        String result = commands.deploy("user-service", "2.0.0", "staging");

        // Then
        assertThat(result).contains("erfolgreich");
        verify(docker).pull("user-service:2.0.0");
        verify(k8s).updateDeployment("staging", "user-service", "2.0.0");
    }

    @Test
    void deploy_shouldReturnErrorOnFailure() {
        // Given
        when(docker.pull(any())).thenThrow(new RuntimeException("Connection refused"));

        // When
        String result = commands.deploy("user-service", "2.0.0", "staging");

        // Then
        assertThat(result).contains("fehlgeschlagen");
    }
}
GraalVM Native Image
Spring Boot 3.x + Spring Shell = Native Image Support!
Warum? Startup-Zeit von 3 Sekunden auf 50ms reduzieren.
pom.xml erweitern:
<profiles>
    <profile>
        <id>native</id>
        <build>
            <plugins>
                <plugin>
                    <groupId>org.graalvm.buildtools</groupId>
                    <artifactId>native-maven-plugin</artifactId>
                    <executions>
                        <execution>
                            <id>build-native</id>
                            <goals>
                                <goal>compile-no-fork</goal>
                            </goals>
                            <phase>package</phase>
                        </execution>
                    </executions>
                </plugin>
            </plugins>
        </build>
    </profile>
</profiles>
Build:
# GraalVM muss installiert sein!
./mvnw -Pnative native:compile
Ergebnis:
$ time java -jar target/devops-admin-1.0.0.jar --help
# ... 2.8 seconds

$ time ./target/devops-admin --help
# ... 0.05 seconds
56x schneller. Perfekt für CI/CD-Pipelines.
Non-Interactive Mode für Skripte
Dein Tool soll auch in Skripten funktionieren:
# Einzelner Command
java -jar devops-admin.jar health-check

# Mit Parametern
java -jar devops-admin.jar deploy user-service --version 2.0.0 --environment production

# Mehrere Commands (Batch)
echo "health-check
deploy user-service --version 2.0.0
logs user-service --lines 10" | java -jar devops-admin.jar
application.properties für CI/CD:
# Für Skript-Nutzung: Keine interaktive Shell
spring.shell.interactive.enabled=false

# Kein Banner
spring.main.banner-mode=off

# Weniger Logging
logging.level.root=WARN
💡 Praxis-Tipps
Für Einsteiger 🌱
- Starte mit einem Command: Nicht gleich 20 Commands planen. Einer, der funktioniert.
- Nutze
help: Spring Shell generiert automatisch Hilfe. Schreibe gutevalue-Beschreibungen.
Für den Alltag 🌿
- Gruppiere Commands logisch:
ServiceCommands,DeployCommands,LogCommands– nicht alles in eine Klasse. - Fail fast: Validiere Inputs am Anfang, nicht mittendrin.
- Gib gutes Feedback: Emojis sind erlaubt! ✅ ❌ ⚠️ machen Outputs lesbarer.
Für Profis 🌳
- Audit alles: Wer hat wann was ausgeführt? Logging ist Pflicht.
- Confirmation für gefährliche Ops:
@ShellMethod("Löscht Service unwiderruflich") public String deleteService(String service, @ShellOption(defaultValue = "false") boolean confirm) { if (!confirm) { return "⚠️ Füge --confirm hinzu um zu bestätigen."; } // ... löschen }
🛠️ Tools & Ressourcen
Für Einsteiger 🌱
| Tool | Warum? | Link |
|---|---|---|
| Spring Shell Docs | Offizielle Doku | docs.spring.io/spring-shell |
| Spring Initializr | Projekt-Bootstrap | start.spring.io |
Für den Alltag 🌿
| Tool | Warum? | Link |
|---|---|---|
| JLine 3 | Die Engine unter Spring Shell | github.com/jline/jline3 |
| AssertJ | Bessere Test-Assertions | assertj.github.io |
Für Profis 🌳
| Tool | Warum? | Link |
|---|---|---|
| GraalVM | Native Image Builds | graalvm.org |
| Picocli | Alternative (leichtgewichtiger) | picocli.info |
❓ FAQ
Frage 1: Kann ich Farben in der Ausgabe nutzen?
Antwort: Ja! Nutze JLine’s AttributedString:
return new AttributedString("✅ Erfolg!",
    AttributedStyle.DEFAULT.foreground(AttributedStyle.GREEN)).toAnsi();
Frage 2: Wie mache ich Tab-Completion für eigene Werte?
Antwort: Implementiere ValueProvider:
@Component
public class ServiceNameProvider implements ValueProvider {
    @Override
    public List<CompletionProposal> complete(CompletionContext context) {
        return registry.getAllServiceNames().stream()
            .map(CompletionProposal::new)
            .toList();
    }
}
Dann: @ShellOption(valueProvider = ServiceNameProvider.class)
Frage 3: Spring Shell vs. Picocli – wann was?
Antwort: Spring Shell wenn du Spring-Ökosystem nutzt (DI, Config, etc.). Picocli wenn du minimale Dependencies willst oder kein Spring hast.
Frage 4: Wie verhindere ich, dass jemand die Shell öffnet aber nichts tut?
Antwort: Session-Timeout in application.properties:
spring.shell.interactive.timeout=300
Nach 5 Minuten Inaktivität: Shell beendet sich.
Frage 5: Kann ich Commands dynamisch registrieren?
Antwort: Ja, aber komplex. Nutze MethodTarget und CommandRegistration. Für die meisten Fälle reichen statische @ShellMethods.
Frage 6: Wie debugge ich einen hängenden Command?
Antwort: Starte mit Remote Debug:
java -agentlib:jdwp=transport=dt_socket,server=y,suspend=n,address=5005 \
     -jar devops-admin.jar
Dann IDE verbinden auf Port 5005.
Frage 7: Was macht ihr bei zwischenmenschlichen Spannungen im Team?
Antwort: Das gehört zu private logs. Ein anderes Kapitel. 🔒
Frage 8: Wie groß wird das JAR?
Antwort: ~30-50 MB mit Spring Boot. Native Image: ~70-100 MB, aber viel schnellerer Startup.
👥 Real Talk: Nova’s erstes CLI-Tool
Nova: „Okay, ich hab den ersten Command am Laufen. Aber mein Code sieht aus wie Spaghetti.“
Code Sentinel: „Zeig mal… Ah, du hast alles in eine Klasse gepackt. ServiceRegistry, HTTP-Calls, Logging – alles in
Commands.java.“
Nova: „Ja, war schneller so.“
Code Sentinel: „Kurzfristig. Langfristig hast du ein Testing-Problem. Wie willst du den Health-Check testen ohne echte Services?“
Nova: „…Mocking?“
Code Sentinel: „Genau. Aber du kannst nur mocken, was du injizierst. Extrahier die Logik in Services, injiziere die in deine Commands, dann wird’s testbar.“
Nova: „Also Commands sind nur die Schnittstelle, die echte Logik gehört in Services?“
Code Sentinel: „Exakt. Commands = Input/Output. Services = Business Logic. Single Responsibility, auch bei CLIs.“ 😊
📦 Downloads
Was du bekommst
| Datei | Inhalt |
|---|---|
devops-admin-complete/ | Vollständiges Projekt mit allen Commands |
grafiken/ | SVG-Diagramme aus diesem Artikel |
tests/ | Beispiel-Tests für alle Commands |
Quick Start
# Download und entpacken
unzip spring-shell-teil2.zip
cd devops-admin-complete

# Bauen und starten
./mvnw clean package
java -jar target/devops-admin-1.0.0.jar

# Oder direkt mit Maven
./mvnw spring-boot:run
Download: spring-shell-teil2.zip
🔗 Weiterführende Links
Offizielle Dokumentation
- Spring Shell Reference – Die komplette Doku
- Spring Shell GitHub – Source Code und Issues
- GraalVM Native Build Tools – Native Image Doku
Community
- Spring Shell Samples – Offizielle Beispiele
- Baeldung Spring Shell – Gutes Tutorial
🎉 Geschafft!
Was du heute gelernt hast:
✅ Spring Shell Projekt von Grund auf aufsetzen
✅ Commands mit Parametern, Defaults und Validierung
✅ Custom Prompts mit Farben
✅ Commands testen (Unit + Integration)
✅ Native Image für schnellen Startup
Du hast jetzt das Werkzeug, um professionelle CLI-Tools zu bauen. Der Rest ist Übung und deine spezifischen Use Cases.
Fragen? Schreib uns:
- Code Sentinel: code-sentinel@java-developer.online
Keep building, keep automating! 💚
Tags: #SpringShell #CLI #DevOps #Java #Automatisierung #Testing
© 2025 Java Fleet Systems Consulting | java-developer.online